 Lacto-Fermenation is one of the oldest food preservation methods still regularly used. It is not Witchcraft or Sorcery and it's effective tasty and pretty much bullet proof. If it tastes good, then it's good. Plus the resultant pickles have the benefit of home made probiotics. Lacto-Fermentation has nothing to do with dairy products, the lacto refers to lactic acid. All fruits and vegetables have beneficial bacteria such as Lactobacillus on the surface. In an anaerobic (oxygen-free) environment, these bacteria convert sugars into lactic acid, which inhibits harmful bacteria and acts as a preservative. It's also what gives fermented foods their characteristic sour flavour. The earliest record of fermentation dates back as far as 6000 B.C. in the Fertile Crescent -and nearly every civilization since has included at least one fermented food in its culinary heritage. From Korean kimchi and Indian chutneys to the ubiquitous sauerkraut.
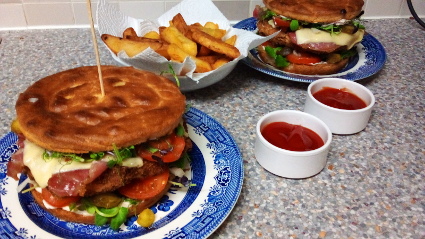
I found some Chicken mince in the discount fridge a week of so ago which has been loitering in the freezer. We’ve been a bit busy DIYing recently and not posted many recipes, but this has to be worth typing up before I go move a friend. Sue and I have both done a stretch at the well known Burger joint that sell reformed Chicken “Breast” sandwiches with Mayo and Lettuce. We thought we’d improve on that basic foundation……
The Burger Buns are Gluten free. The recipe is here - http://www.eatwellonuc.org.uk/index.php/recipes/27-gluten-free-diy-bread-buns
By way of building the Burger we went with the following “Plan” (This really was kitchen / food fun to entertain us in Lock-Down #3!)
Bun
Mayo
Salad, sliced Gherkins, Sliced Tomatoes
Chicken Burger
Crispy Bacon
Melted Gouda
Sliced Tomato
Salad
Bun
So the Chicken burger – Be warmer minced Chicken is really slimy and not great to handle….
Burger Ingredients:-
500g of Chicken mince
Fresh Bread crumbs (Gluten free in our case), sufficient to form a firm feeling meat mix
Mixed Herbs
Garlic Salt
Onion Powder
Salt & Black Pepper
Cayenne Pepper
Oil to fry
Coating Ingredients:-
2 battered Eggs, for an egg wash
Plain Flour (Gluten free for us)
Fresh Bread crumbs (Gluten free in our case)
Mixed Herbs
Garlic Salt
Onion Saly
Salt & Black Pepper
Cayenne Pepper
Turmeric
Chilli Flakes
Additions:-
Crispy grilled Bacon
Sliced Cheese, whichever you fancy
Method:-
(1) Mix all the Burger ingredients, excluding the Oil and form into Burgers of the required size to fit your buns.
(2) Place in the freezer to firm up while your prepare the coating.
(3) Put the Egg wash and Flour in two separate bowls ready for dredging.
(4) Mix the remaining coating ingredients and put them within reach of your Flour and Egg wash.
(5) Heat a frying pan with quite a bit of Oil
(6) Remove the Burgers from the freezer.
(7) Dredge each burger in Flour, then Egg wash and then coat well on all sides with the Bread crumb mix.
(8) Fry each Burger flipping regularly until they have browned well on both sides.
(9) Drain on kitchen paper.
(10 Add the Bacon and Cheese and place under the grill to melt the Cheese
(11) Assemble your Burger.
We served ours with thick hand cut chips and Tomato sauce. We’ll be eating left over Burger for most of the day, but these were really good and well worth the effort! Realistically the quantities would easily have fed a family of four.

